
Late February through mid-March is the window when experienced gardeners across most of the United States are starting seeds indoors, and it's the ideal time for beginners to try it for the first time. Starting your own transplants from seed costs a fraction of buying nursery starts, gives you access to hundreds of varieties your local garden center doesn't carry, and adds roughly four to eight weeks to your growing season.
The process is simpler than most gardening guides make it sound. You need containers, seed-starting mix, light, water, and a basic understanding of timing. The mistakes that kill seedlings are consistent and avoidable. This guide covers exactly what you need, when to start, and the specific errors to watch for.
Getting the Timing Right
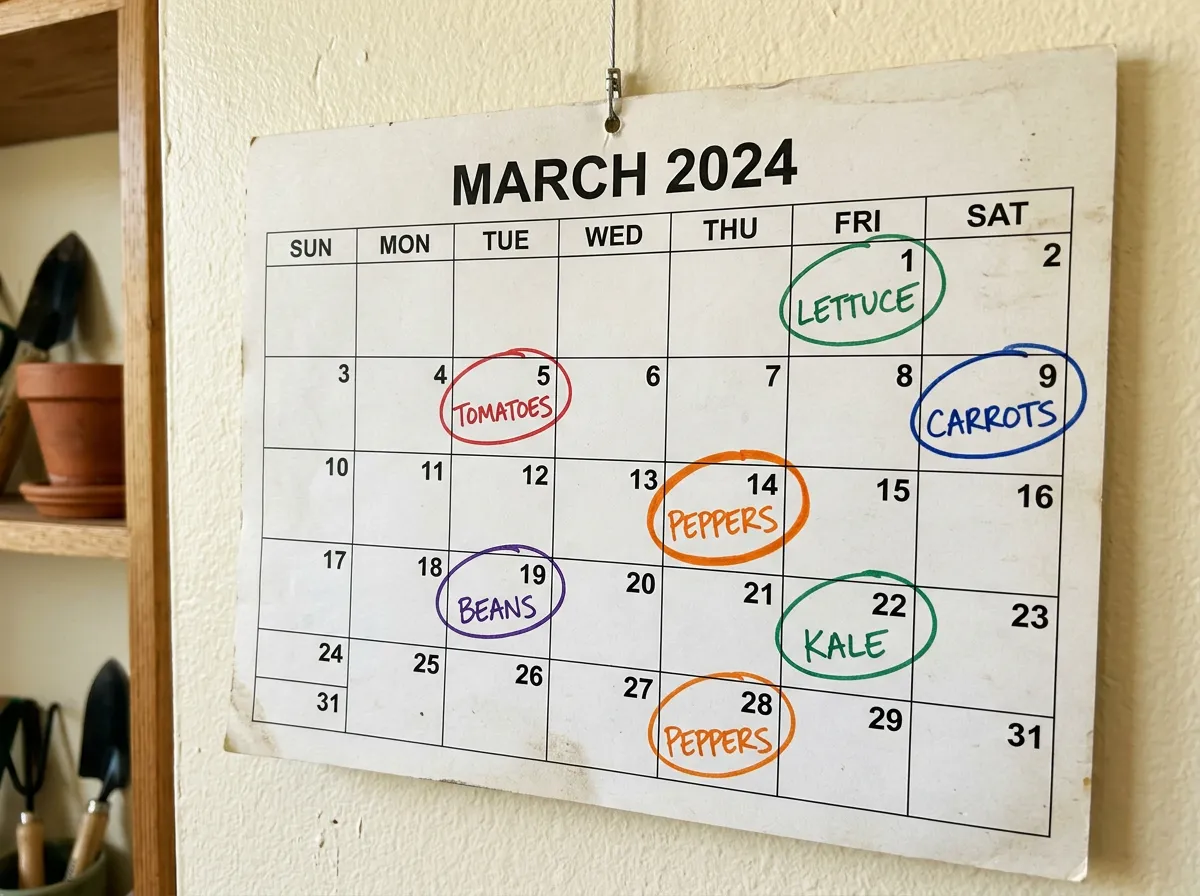
The single most important variable in seed starting is when you begin, and the answer depends on one date: your area's average last frost date. Everything else counts backward from there.
Iowa State University Extension recommends that "early to mid-March is the best time to start many vegetables and annual flowers indoors for transplanting outside once the threat of frost has passed." But that guidance assumes a late April to mid-May last frost date, typical for USDA Zones 5 and 6. If you're in Zone 7 or warmer, you may be starting some seeds right now. If you're in Zone 4 or colder, you have a few more weeks.
The general rule is straightforward. Peppers and eggplant need the longest head start: 8 to 10 weeks before your last frost date. Tomatoes need 6 to 8 weeks. Broccoli, cabbage, and cauliflower need 6 to 8 weeks. Lettuce needs only 2 to 3 weeks. Annual flowers like marigolds and zinnias need 3 to 6 weeks. Your seed packets will specify this timeline, and following the packet instructions is more reliable than any general guide.
The critical mistake here is starting too early. It sounds counterintuitive, but seedlings started eight weeks early when they only need four will be leggy, root-bound, and weak by transplant time. A tomato seedling that spent 12 weeks in a small cell will perform worse in the garden than one started on time and transplanted at six weeks. The University of Maryland Extension confirms this is the single most common beginner error: eagerness beats patience, and the plants suffer for it.
The Supplies You Actually Need
Seed starting doesn't require expensive equipment. Here's what you need and what you can skip.
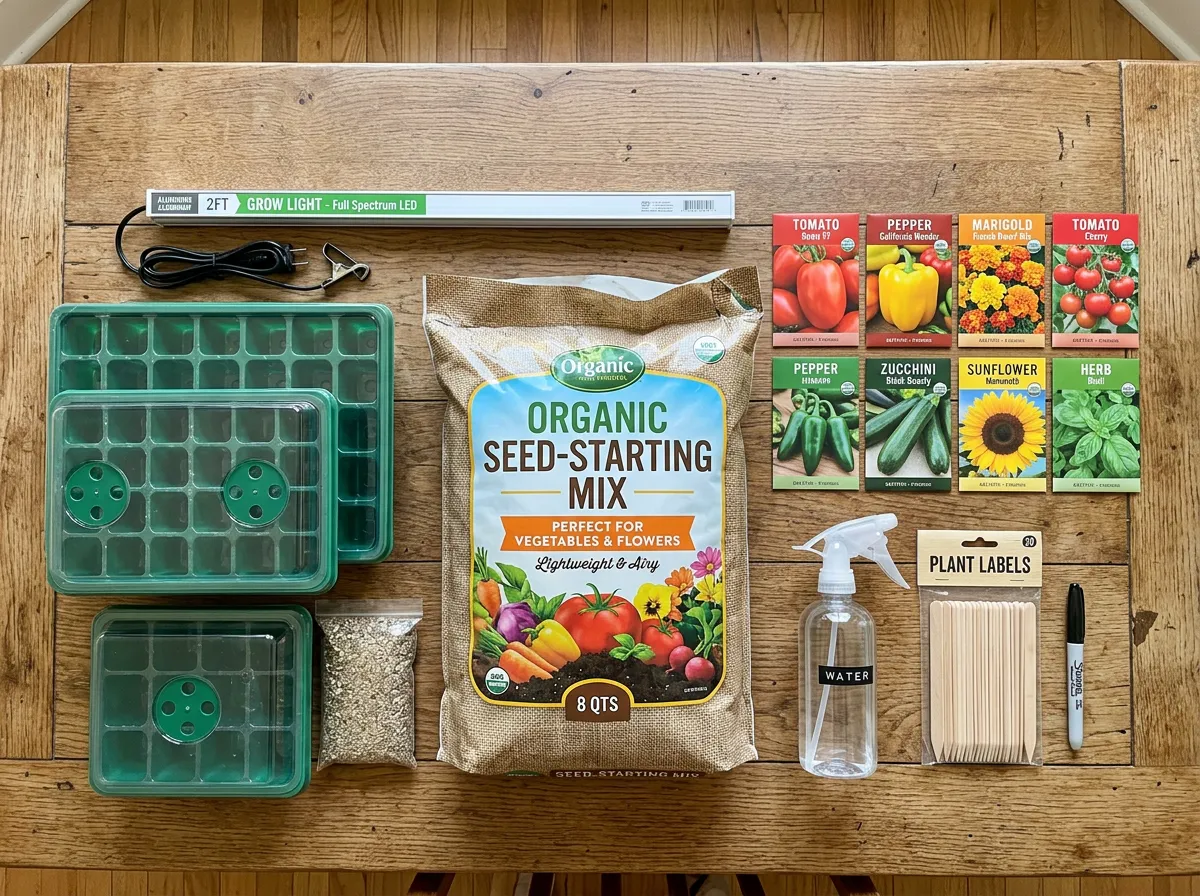
Containers can be anything with drainage holes. Cell trays and flats designed for seed starting work well and are cheap (usually $2 to $5 for a 72-cell tray), but recycled yogurt cups, egg cartons, and plastic food containers with holes poked in the bottom work too. The University of Minnesota Extension advises sterilizing reused containers in a solution of 1 part bleach to 10 parts water for 30 minutes to prevent disease. Drainage is non-negotiable. Seedlings sitting in waterlogged soil develop damping off, a fungal condition that kills them at the soil line overnight.
Seed-starting mix is different from potting soil and very different from garden soil. You want a commercial seed-starting mix, typically a blend of peat moss or coconut coir with vermiculite and perlite. The University of Minnesota Extension describes it as "sterile, lightweight and free from weed seeds, with a texture and porosity especially suited to germinating seeds." Never use soil from your garden. It's too heavy, drains poorly, and contains pathogens that seedlings can't resist. A bag of seed-starting mix costs $5 to $10 and will fill dozens of cells.
Before filling your containers, moisten the mix thoroughly. The University of Maryland Extension specifies the target consistency: "a wrung-out sponge, not soppy wet." Dry mix repels water and creates air pockets around seeds. Pre-moistened mix makes consistent contact with the seed, which is what triggers germination.
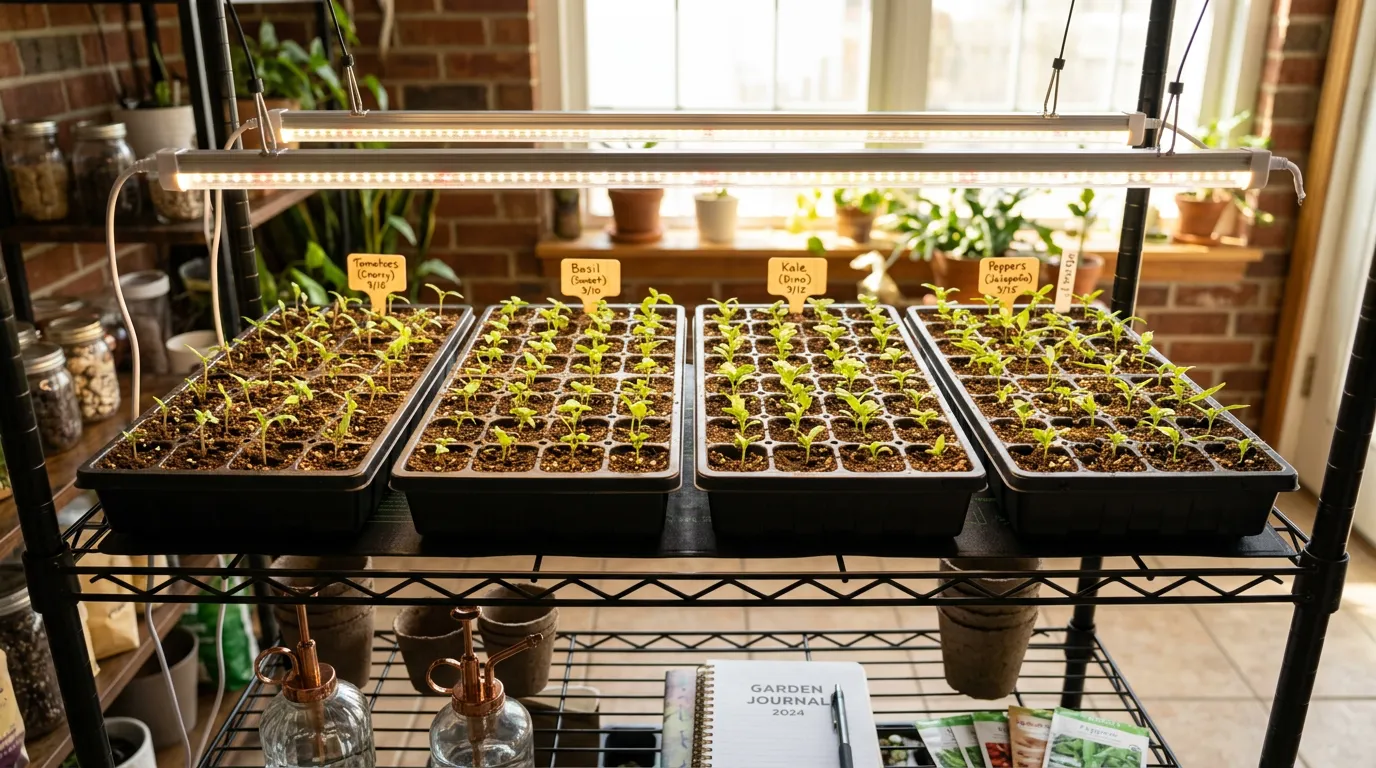
Lighting is where most beginners make their biggest equipment mistake: they try to use a windowsill. The University of Maryland Extension is direct about this: "The natural light from a window is seldom enough for good, strong seedling growth." Even a south-facing window provides only a few hours of direct light, and seedlings need 12 to 16 hours daily. The result of insufficient light is tall, thin, floppy seedlings that fall over under their own weight.
The good news is that you don't need expensive grow lights. Utah State University Extension confirms that standard fluorescent or LED shop lights are sufficient. A two-pack of 4-foot LED shop lights costs $20 to $30 at any hardware store and will cover a full tray of seedlings. Hang them 2 to 4 inches above the seedling tops and run them on a $5 outlet timer set for 14 to 16 hours per day. Raise the lights as the seedlings grow.
Optional but helpful: a heat mat with thermostat to maintain 65-75°F soil temperature during germination (seeds sprout faster in warm soil), and a small fan running on low to circulate air (strengthens stems and prevents fungal problems). Neither is strictly necessary, but both improve success rates noticeably.
Step-by-Step Planting Process
With your supplies ready, the actual planting takes about 30 minutes for a full tray.
Step 1: Fill and firm. Fill each cell with moistened seed-starting mix to about a quarter inch below the rim. Press gently with your fingers to eliminate large air pockets, but don't compact the mix. Seeds need loose soil to push their roots through.
Step 2: Plant at the right depth. Follow the seed packet for depth. As a general rule, plant seeds at a depth of about twice their diameter. Very small seeds (lettuce, petunias) should be pressed gently onto the surface without covering them at all, as they need light to germinate. Larger seeds (tomatoes, peppers) go about a quarter inch deep. Drop two seeds per cell as insurance against poor germination; you'll thin to the strongest seedling later.
Step 3: Cover and create humidity. Place a clear plastic dome or wrap over the tray to create a greenhouse effect. This keeps humidity high during the germination period, which typically takes 5 to 14 days depending on the crop. Set the tray in a warm spot (on top of a refrigerator works, or use a heat mat). Seeds don't need light until they sprout, so the lights stay off during this phase.
Step 4: Remove covers immediately when sprouts appear. This step catches beginners off guard. The moment you see the first green sprout poking through, remove the humidity dome. Leaving it on creates the moist, stagnant conditions that cause damping off. Turn on your lights and position them 2 to 4 inches above the seedlings.
Step 5: Water from the bottom. Once seedlings are up, water by pouring into the tray beneath the cells and letting the soil wick moisture upward. This keeps the soil surface drier (reducing disease) while ensuring roots get adequate moisture. Let the top layer dry slightly between waterings. Overwatering kills more seedlings than underwatering.
Step 6: Thin to one per cell. When seedlings develop their first set of true leaves (the second pair, which look different from the initial seed leaves), snip the weaker seedling at soil level with scissors. Don't pull it out, as this disturbs the roots of the keeper. Thinning feels wasteful but is essential. Overcrowded seedlings compete for light and grow into spindly, weak transplants.
Step 7: Start feeding. Once true leaves appear, begin fertilizing with a diluted liquid fertilizer (half the recommended strength) once a week. Seed-starting mix contains no nutrients, so seedlings need supplemental feeding once their seed reserves are depleted.
Best Crops for First-Time Seed Starters
Not all plants are equally forgiving to beginners. These varieties germinate reliably, tolerate minor mistakes, and produce satisfying results.
Tomatoes are the classic starter crop for a reason. They germinate in 5 to 10 days, grow vigorously, and are forgiving of imperfect conditions. Starting tomatoes from seed also gives you access to hundreds of heirloom and specialty varieties that nurseries rarely stock. Cherry tomato varieties like 'Sun Gold' and 'Sweet Million' are particularly beginner-friendly because they produce abundantly even in less-than-ideal garden conditions.
Marigolds are the easiest annual flower to start from seed. Penn State Extension's Master Gardener program describes them as "very easy to grow from seed; they are great for beginners." They germinate in under a week, grow fast, tolerate transplant handling well, and produce bright blooms all summer. Zinnias and cosmos are equally reliable and come in colors that make a garden look established even in its first year.
Peppers need a longer indoor head start (8 to 10 weeks) but are otherwise straightforward. They germinate a bit slower than tomatoes (7 to 14 days) and prefer warmer soil temperatures, which is where a heat mat helps most. Both sweet bell peppers and hot varieties grow well from seed.
Avoid starting beans, corn, carrots, radishes, and large-seeded cucurbits (cucumbers, melons, squash) indoors. These crops either resent root disturbance during transplanting or grow so fast that direct sowing outdoors works better. Plant those directly in the garden after your last frost date.

The Hardening Off Step Everyone Skips
You've grown beautiful seedlings under lights for six weeks. They look healthy and strong. The temptation is to carry the tray outside, dig holes, and plant them. Don't.
Indoor seedlings have never experienced wind, temperature fluctuations, or direct sunlight. Moving them straight outdoors causes transplant shock: wilting, sunburn, stunted growth, or death. The fix is a process called hardening off, which Penn State Master Gardener Pamela T. Hubbard recommends spreading over approximately 10 days.
Start by placing your seedlings outdoors in a sheltered, shaded spot for 2 to 3 hours on day one. Bring them back inside. Each subsequent day, increase the time outside by an hour or two and gradually introduce more direct sunlight. By day 7 to 10, they should be spending full days outside including some direct sun. Then transplant, ideally on a cloudy day. This process costs nothing but patience, and it's the difference between transplants that thrive and transplants that sit stunned in the ground for weeks.
NC State Extension's Chris Blaha adds one more tip for the entire indoor growing period: run a small fan near your seedlings on low. The gentle air movement strengthens stems (mimicking outdoor wind) and reduces the stagnant moisture conditions that breed fungal diseases. It's a $10 investment that prevents the most common indoor seedling killer.
What to Remember
Start seeds indoors 6 to 8 weeks before your last frost date (8 to 10 for peppers). Use seed-starting mix, not garden soil. Provide 14 to 16 hours of light from cheap LED shop lights hung 2 to 4 inches above seedlings. Water from the bottom. Remove humidity covers immediately when sprouts appear. Thin to one seedling per cell. Harden off over 10 days before transplanting.
The most common mistakes are starting too early, using insufficient light, overwatering, and skipping hardening off. Avoid all four and your first seed-starting season will produce strong, healthy transplants that outperform nursery starts, at a fraction of the cost.
Sources
- Starting Seeds Indoors - University of Minnesota Extension
- Starting Seeds Indoors - University of Maryland Extension
- Guide to Starting Seed Indoors - Iowa State University Extension
- Seed Starting Demystified - Penn State Extension, Pamela T. Hubbard
- Starting Vegetable Seeds Indoors: Materials - Utah State University Extension
- A Head Start on Spring: Starting Seeds Indoors - NC State Extension, February 2026